WEB Programmer - Python

Unit 4

UNIT 4: The Python programming language

AIMS & OBJECTIVES

1) The purpose of this Unit is to enhance migrants’ basic soft skills and competencies, which are needed in today’s labor market and help them in their fist steps while in search for a job.

2) The main part of this presentation is the compilation of programmers with Python

3) The Unit aims at helping the reader to understand «displaying messages», «working with buttons», «adding images» and «checkboxes».

LEARNING OUTCOMES

After completing the course you will attain a fundamental understanding of the Python programming language, object oriented programming base, essential skills to specialize on particular branches — machine learning, data science etc.

KEYWORDS

  • Python
  • most popular programming languages (human readable)
  • Guido van Rossum
  • machine learning
  • working with variables
  • evaluative logic
  • branching with a conditional operator
  • development of interfaces

TABLE OF CONTENTS

4.1. Development of interfaces. Launching the window interface

In Python, the module you can use to create graphical applications is called tkinter (toolkittointerface).

To provide attributes and methods for creating a windowed interface, tkinter, like other modules, must be imported into a Python program. Every program that uses the resources of this module must start by calling the Tk () constructor, which creates a window object. Using the geometry () method of this object, you can optionally specify the dimensions of the window by passing the string ‘widths height’ as an argument. You can also create a title for the window by passing the title () method the ‘title’ string argument. If dimensions and title are not specified, then the default values will be used.

Each program must be terminated by the so-called window event loop, called by the mainloop () method, which reacts to user actions with the window during program execution (closing the window to exit the program, or simply resizing it).

All GUI controls created using the tkinter module, such as buttons or checkboxes, are called widgets. The simplest example of a widget is a Label, which displays plain text or an image in the application interface. It is created using the Label () constructor, which takes as arguments the name of the window and the text for the label itself in the form text = ‘string’.

4.1. Development of interfaces. Launching the window interface

After creating any widget, you need to place it on the window. There are special methods for this in Python, called placement managers.

  • pack () – places widgets on the specified side of the window using the side = parameter, which can take on the values of four constants: TOP, BOTTOM, LEFT and RIGHT.
  • place () – places the widget at the point of the window with the X, Y coordinates specified for it in the form of parameters x =, y =, specified numeric values in pixels.
  • grid () – allows to place the widget in a table cell in accordance with the specified numeric parameters row =, column =, which determine the row number and column number of this cell.

The pack () method can also take additional arguments, including fill, which determines the widget’s ability to fill free space along any of the axes, for example, along the x-axis: fill = ‘x’, as well as padx, pady arguments, which specify the expansion of the widget along the corresponding axes by a certain number of pixels.

4.1. Development of interfaces. Launching the window interface

  1. Create a new Python program in which first make available the functions of the cgi module.

fromtkinterimport *

  1. Then call the constructor to create the window object.

window = Tk ()

  1. Now set a title for this window.

window.title (‘LabelExample‘)

  1. Add a statement calling the constructor that creates the Label object.

label = Label (window, text = ‘HelloWorld!’)

  1. Use the layout manager to add a label to the window by specifying the horizontal

and vertical fill options.

label.pack (padx = 200, pady = 50)

  1. Finally add the required statement with the window event loop.

window.mainloop ()

  1. Save the file in your working directory, open a command prompt and run the program with the python command

tk_window.py – A window containing the Label widget will appear.

4.2. Working with buttons

WidgetButton is a “button” graphical window interface element that can contain either text or an image that conveys the semantic purpose of the button. A Button object is created by specifying the window name and options as arguments to the Button () constructor. Each option is defined as an option = value pair. The defining option is command, which specifies the name of the function or method to be called when the user clicks the button. The most popular options and their brief description are shown in the table below.

The values assigned to the various options determine the appearance of the widget. The options can be changed using the widget’s config () method, specifying the new value of the option = value pair as an argument. Alternatively, you can get the value of each option using the widget’s cget () method, specifying the name of a particular option as a string argument.

4.2. Working with buttons

Option                                                          Description

Activebackground             The background color of the active element

Activeforeground             The foreground color of the active element

bd                                             Border width in pixels (default: 2)

bg                    Background color command Function to be called when pressed

fg                                                               Foreground color

font                                              The font for the button label

height           Height of the button (for text in the number of lines, for images – in pixels)

highlightcolor                                    Border color on hover

image                                          Image for output instead of text

justify                               Alignment view (left, center, right)

padx                                          Number of pixels to edge horizontally

pady                                       Number of pixels to edge vertically

relief     Relief type of the frame (SUNKEN – recessed, RIDGE – convex border, RAISED – convex, GROOVE – groove)

state                        State (NORMAL – working or DISABLED – disabled)

underline          The ordinal number of the character in the text to be underlined (default value: 1)

width                The width of the button (in characters for text, in pixels for an image)

wraplength            A parameter that determines the width into which the text fits.

4.2. Working with buttons

  1. Start a new Python program with the gui module functions available and create a window with a title.

from tkinter import *

window = Tk ()

window.title (‘ButtonExample‘)

  1. 2. Now create a button that will exit the program.

btn_end = Button (window, text = ‘Close’, command = exit)

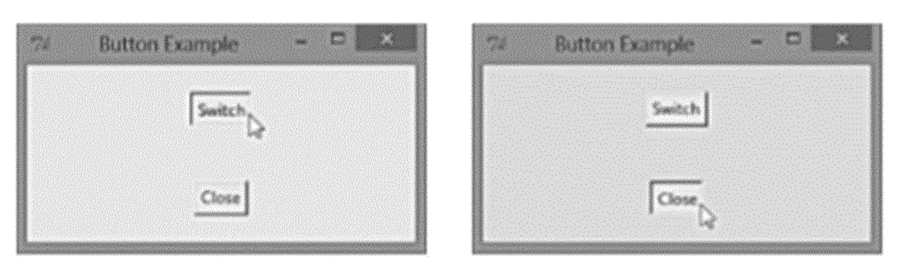
  1. Then add a function that will toggle the background color of the window after clicking another button.

deftog ():

if window.cget (‘bg‘) == ‘yellow’:

window.configure (bg = ‘gray’)

else:

window.configure (bg = ‘yellow’)

  1. 4. Now create a button that will invoke the function.

btn_tog = Button (window, text = ‘Switch’, command = tog)

  1. Add both buttons to the window, specifying horizontal and vertical fill options.

btn_end.pack (padx = 150, pady = 20)

btn_tog.pack (padx = 150, pady = 20)

  1. 6. Finally add the window event loop.

window.mainloop ()

  1. Save the file in your working directory, open a command prompt and run the program with the pythontk_button command. py – click the button to see the result of changing the background color of the window.

4.3. Displaying messages

In a Python program, you can display messages to the user as dialog boxes using methods exposed by the tkinter.messagebox module. This module must be imported separately, and instead of its long name, assign an alias using the importas statement. A dialog box can be created using the following titles of one window, as well as the message itself in the form of two arguments for the following methods.

Methods that display the dialog contain a single OK button, return no value on its user interface. Methods that return a value can use this return value for further conditional branching.

4.3. Displaying messages

  1. Start a new Python program, making available the functions of the gui module as well as the dialog box module, shortly alias the field.

from tkinter import *

import tkinter.messagebox as field

  1. Next, create a window object and provide a title for it.

window = Tk ()

window.title (‘Button example’)

  1. 3. Add a function to display various dialog boxes.

defdialog ():

var = box.askyesno (‘Message box’, ‘Continue?’

) if var == 1:

box.showinfo (‘Yes Box’, ‘Continuation …’)

yet:

box.showwarning (“No box”, “Cancel …”)

  1. Then create a button that will trigger the function.

btn = Button (window, text = ‘Click’, command = dialog)

  1. Add a button to the window, specifying the filling parameters.

btn.pack (padx = 150, pady = 50)

  1. 6. Finally add the window event loop.

window.mainloop ()

  1. 7. Save the file in your working directory, open the command program and run the program with the command pythontk_message.py – click the button to see the dialog boxes that appear.

4.4. Receiving data from the user

To retrieve data entered by the user in a GUI application, there is an Entry widget in the tkinter module that provides a one-line input field. An input object is created using the Entry () constructor by specifying the name of the parent container (such as a window or frame) as arguments, and the options to use, each of which is passed as an option = value pair. The most commonly used options and their brief description are shown in the table below:

Option                                                                     Description

bd                                                       Border width in pixels (default: 2)

bg                                                                       Background color

fg                                                                         Foreground color

font                                                                  The font for the text

highlightcolor                                               Border color on hover

selectbackground                           Background color of selected text

selectforeground                           The foreground color of the selected text

show                                            Use masking symbols instead of visible symbols.

state                                         State (NORMAL – working or DISABLED – disabled)

width                                               Width of the input field in characters

4.5. Select from a list

Elements are added to the list using the Insert () method, to which the ordinal number of the element in the list and a string defining the element itself are specified as arguments. Any element of the list can be obtained using the get () method, specifying its ordinal as an argument. In addition, the listbox object has a useful curselection () method that returns the ordinal of the currently selected item, so it can be used as an argument to the get () method to get the current selection.

4.5. Select from a list

  1. Create a new Python program in which first make the functions of the cgi module available, and then include the module for working with dialog boxes, specifying an alias for it.

from tkinter import *

import tkinter.messagebox as box

  1. Next, create a window object with a title.

window = Tk ()

window.title (‘Listbox Example’)

  1. Now create a frame for the widgets.

frame = Frame (window)

  1. Create a Listbox widget with three list items.

listbox = Listbox (frame)

listbox.insert (1, ‘HTML5 in easy steps’)

listbox.insert (2, ‘CSS3 in easy steps’)

listbox.insert (3, ‘JavaScript in easy steps’)

  1. Then add a function to display the selected list items.

defdialog ():

box.showinfo (‘Selection’, ‘Your Choice:’ + \

listbox.get (listbox.curselection ()))

  1. Now create a button that, when clicked, will call the function.

btn = Button (frame, text = ‘Choose’, command = dialog)

  1. Place the combo box button on the frame, specifying the placement options.

btn.pack (side = RIGHT, padx = 5)

listbox.pack (side = LEFT)

frame.pack (padx = 30, pady = 30)

  1. Finally add the window event loop

window.mainloop ()                                                                 9. Save the file in your working directory, open a command prompt and run the program with the pythontk_listbox command. py – now select a line from the list, click the button and you will see an informational message appear confirming your choice.

4.6. Checkboxes

The Checkbutton widget provides for the addition of a single “checkbox” element to the graphical application, which can be selected (selected) by the user. Usually a group of such checkboxes is used, and the user can select one or several from this group. Checkbox objects each set their control object variable, and are assigned a value according to whether the user has checked the checkbox or not. To create such an object variable, use the StringVar () constructor, which creates an empty string, or the IntVar () constructor, which initializes an empty integer object variable.

The checkbox object is created using the Checkbutton () constructor, which is passed five arguments.

  • The name of the parent container, such as a frame.
  • A text string that will be a label, passed as a pair text = ‘text’.
  • Control variable-object, specified as a pair variable = variable-name.
  • The value to be assigned, if the flag is set by the user, passed as a pair onvalue = value.
  • The value to be assigned, if the flag is not selected (cleared) by the user, passed as a pair offvalue = value.

The integer value that is assigned as a result of checking the checkbox can be obtained from the object variable using the get () method

4.6. Checkboxes

  1. Create a new Python program in which first make the functions of the cgi module available, and then include the module for working with dialog boxes, specifying an alias for it.

from tkinter import *

import tkinter.messagebox as box

  1. Next, create a window object with a title bar.

window = Tk ()

window.title (‘Check Button Example’)

  1. Now create a frame for the widgets.

frame = Frame (window)

  1. Next, create three integer object variables that will store values based on the user’s selection.

var_1 = IntVar ()

var_2 = IntVar ()

var_3 = IntVar ()

  1. Create a triple checkbox widget whose values will be written to object variables.

book_1 = Checkbutton (frame, text = ‘HTML5’, \

variable = var_1, onvalue = 1, offvalue = 0)

book_2 = Checkbutton (frame, text = ‘CSS3’, \

variable = var_2, onvalue = 1, offvalue = 0)

book_3 = Checkbutton (frame, text = ‘JS’, \

variable = var_3, onvalue = 1, offvalue = 0)


  1. Now add a function that displays the current user selection.

defdialog ():

str = ‘Your Choice:’

if var_1.get () == 1: str + = ‘\ nHTML5 in easy steps’

if var_2.get () == 1: str + = ‘\ nCSS3 in easy steps’

if var_3.get () == 1: str + = ‘\ nJavaScript in easy steps’

box.showinfo (‘Selection’, str)

4.6. Checkboxes

  1. Then create a button that, when clicked, will call the function.

btn = Button (frame, text = ‘Choose’, command = dialog)

  1. Now place the button with three checkboxes on the frame, specifying the placement options.

btn.pack (side = RIGHT, padx = 5)

book_1.pack (side = LEFT)

book_2.pack (side = LEFT)

book_3.pack (side = LEFT)

frame.pack (padx = 30, pady = 30)

  1. Finally, add the window event loop.

window.mainloop ()

  1. Save the file in your working directory, open a command prompt and run the program with the pythontk_check. py – now check one or more checkboxes, click the button and you will see an informational message pop up confirming your choice.

4.7. Adding images

The tkinter plugin allows you to work with GIF or PGM / PPM image files that can be displayed on Label, Text, Button or Canvas widgets. For these purposes, the Photoimage () constructor is used, which creates an image object. It is enough to give it as an argument the name of the required image file in the form file = ‘filename’. You can use the useful subsample () method to scale down the image by specifying the horizontal and vertical sampling parameters as x = value and y = value as arguments. For example, the specified values x = 2, y = 2 will result in discarding every other pixel, that is, the image will be reduced by half in relation to the original.

After the image object has been created, it can be added to the Label or Button widgets by specifying the image = option in the corresponding constructors.

Text widgets have an image_create () method that embeds the image in the text field. This method takes two arguments: the first is to determine the placement position (for example, ‘1.0’ indicates the first line and the first character), the second is a direct link to the image itself in the form of image = option.

Canvas objects have a similar create_image () method, which also takes two arguments, only the first one, which is responsible for positioning, is represented as a pair of coordinates (x, y) that define the point on the canvas (Canvas element) where the image is placed.

4.7. Adding images

  1. Start a new Python program, making available the methods and attributes of the cgi module, and then create a window object with a string for its title.

from tkinter import *

window = Tk ()

window.title (‘ImageExample‘)

  1. 2. Then create an image object from a local system file.

img = PhotoImage (file = ‘python.gif’)

  1. 3. Now create a Label object to display the image over the yellow background of the label.

label = Label (window, image = img, bg = ‘yellow’

  1. 4. Then create another image object containing the original image, reduced in half.

small_img = PhotoImage.subsample (img, x = 2, y = 2)

  1. 5. Create a button to display a thumbnail image.

btn = Button (window, image = small_img)

  1. 6. Now create a text box, embed the thumbnail, and then add a line of text after it.

txt = Text (window, width = 25, height = 7)

txt.image_create (‘1.0’, image = small_img)

txt.insert (‘1.1’, ‘Python Fun!’)

  1. 7. Create a canvas element and place the second image, and then a diagonal line on top.

can = \

Canvas (window, width = 100, height = 100, bg = ‘cyan’)

can.create_image ((50, 50), image = small_img)

can.create_line (0, 0, 100, 100, width = 25, fill = ‘yellow’)

4.7. Adding images

  1. Now add widgets to the window.

label.pack (side = TOP)

btn.pack (side = LEFT, padx = 10)

txt.pack (side = LEFT)

can.pack (side = LEFT, padx = 10)

  1. Finally, add the window event loop.

window.mainloop ()

  1. Save the file in your working directory, open a command prompt and run the program with the command pythontk_photo.py to observe the result of working with images.

SYNOPSIS

Python is a high-level (“human readable”) programming language that uses an interpreter to display results. Python contains an extensive standard library of tested code modules that can be easily incorporated into your own programs.

Developed by GuidovanRossum in the late 1980s and early 1990s at the National Research Institute of Mathematics and Computer Science in the Netherlands, Python is derived from many other languages, including C, C ++ and the Unix shell. Today Python is supported by the core team at the institute, although Guido vanRossum still plays an important role in determining the direction of the language. Code readability, making Python especially suitable for newbies to programming.

Because Python is focused on code readability, it often uses English keywords where other programming languages tend to use punctuation marks. A special difference is that Python uses indentation rather than keywords or punctuation marks to group statements in a block of code.

List of references

  • Eric Matthes, Python Crash Course. (No Starch Press, 2016)
  • Al Sweigart, Invent Your Own Computer Games with Python, 4th edition. (No Starch, 2017)
  • Dan Bader, Python Tricks: A Buffet of Awesome Python Features. (dbader.org, 2017)
  •  
  •  

Further reading

  • John Zelle, “Python Programming: An Introduction to Computer Science Paperback”. Franklin, Beedle&Associates Inc. www.fbeedle.com 3/09/10
  • Paul Barry, “Head First Python 2e: A Brain-Friendly Guide Paperback”. www.oreilly.com 16/12/16