Web Programmer - Java

Module 1

Advanced Level

Youth Included ZS.

Unit 4: The Java programming language

AIMS & OBJECTIVES

1) The purpose of this Unit is to enhance migrants’ basic soft skills and competencies, which are needed in today’s labor market and help them in their fist steps while in search for a job.

2) The main part of this presentation is the compilation of programmers with Java.

3) The Unit aims at helping the reader to understand «command line», «file recording», «multiple classes», «formatting numbers», «collection of methods», «importing functions».

LEARNING OUTCOMES

LOut1: Understand the concept of Java language

LOut2: Describe the installation steps, regarding the Java language

LOut3: Create your first program in Java

LOut4: Demonstrate knowledge in running programs

LOut5: Contrast data types

LOut6: Formulate constants

KEYWORDS

Variables
Java
Javac
JavaDevelopmentKit
James Gosling
JavaRuntimeEnvironment (JRE)
StandardEditionDevelopment Kit (JDK)
1995
Constants

TABLE OF CONTENTS

4.1 Program as a collection of methods

    Programs are usually split into separate methods – this is how code modules are created, each of which performs a specific task and can be called any number of times as needed. This breakdown of the program into multiple methods also makes it easier to track errors because each method can be tested separately. Methods can be declared inside curly braces that follow the class declaration, using the same keywords as when declaring the main method. Any new method must be given a name following standard naming conventions, and arguments in parentheses after the method name must be specified as needed.

  1. Create a new program named Methods containing the standard main method.

class Methods

 {

 public static void main (String [] args) {}

}

  1. Inside the curly braces of the main method, add statements to display the message and call the second method named sub.

 System.out.println (“Message from the main method.”);

sub ();

  1. After the main method, before the last curly brace of the class, add a second method

to display the message.

 public static void sub ()

 {

 System.out.println (“Message from sub method.”);

 }

4. Save the program as Methods.java, then compile and run

4.2 Using multiple classes

    Just as a program can contain several methods, large programs can be composed of several classes, each of which represents its own functionality. This modularity is preferable to writing the entire program in one class, and it makes debugging easier.

The public keyword, which is added during the declaration, is a so-called access modifier that determines the visibility of an element to other classes. It can be used in a class declaration to explicitly indicate that the class will be accessible (visible) to other classes. If the public keyword is omitted, the default is to allow access from other local classes. However, the public keyword must always be used for the main method in order for the method to be visible to the compiler.

  1. Create a new program named Multi containing the standard main method (including the public keyword as usual).

class Multi

 {

 public static void main (String [] args) {}

}

  1. Within the curly braces of the main method, declare and initialize a variable of string type, and then display its contents.

 String msg = “This is a local variable of the Multi class”;

 System.out.println (msg);

  1. Output the contents of the constant named txt from the Data class.

System.out.println (Data.txt);

  1. Call the method named greeting from the Data class.

 Data.greeting ();

4.2 Using multiple classes

  1. Call the line method from the Draw class.

 Draw.line ();

  1. Save the program as Multi.java.
  2. Start a new file by creating a Data class.

 class Data

 {

 }

  1. 8. Declare and initialize a class constant.

public final static String txt =

“This is a global variable of the Data class”;

  1. Add a method class.

 public static void greeting

{

 System.out.print (“This is a global method”);

System.out.println (“Data class”);

}

  1. Save the file as Data.java in the same directory as the Multi.java program.
  2. Create a new file by creating a Draw class and a line method to access

the default is without the public keyword.

class Draw

 {

 static void line ()

{

 System.out.println (“__________________________”);

 }

 }

  1. Save the file as Draw.java in the same directory as the Multi.java program, then compile and run.

4.3 Object class creation

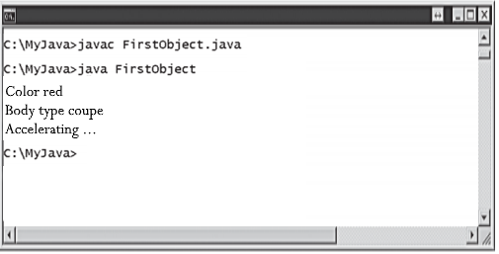
Objects of the real world that surround us can be described using attributes (characteristics or properties), as well as the actions that they perform. For example, a car can be described using the attributes “red”, “coupe”, or using the action “accelerate”. For Java programming, all of this can be represented using the Car class, which contains the color and bodyType properties, as well as the accelerate () method.

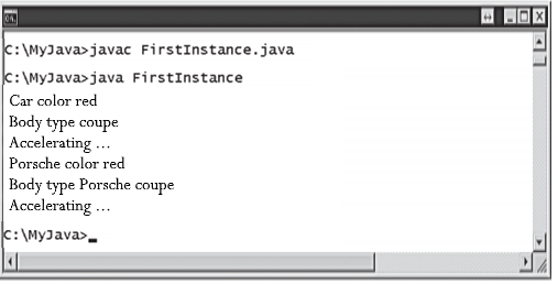
Because object attributes and methods are widely used in Java programming, Java is said to be an object-oriented programming language. Objects in Java are created by defining a class as a template from which copies (instances) can be made. Each instance of the class can be assigned attributes and methods that describe the object. Next, we create the Car class as a class template with the default attributes and methods described above. After that, an instance of the Car class is created, which inherits the same attributes and methods by default.

4.3 Object class creation

  1. Start a new class template named Car.

class Car

{

}

  1. Within the curly braces of the Car class, declare and initialize two global string constants that describe the attributes.

public final static String color = “Red”;

 public final static String bodyType = “Coupe”;

  1. Add a global method describing the action.

public static String accelerate ()

 {

 String motion = “Accelerating …”;

return motion;

 }

  1. After the Car class, start a new class named FirstObject that contains the standard main method.

class FirstObject

 {

 public static void main (String [] args) {}

}

  1. Inside the curly braces of the main method, add statements to print out each of the

attribute values ​​of the Car class and also call its method.

 System.out.println (“Color” + Car.color);

 System.out.println (“Body type” + Car.bodyType);

System.out.println (Car.accelerate ());

  1. Save the program as FirstObject.java, then compile and run.

4.4 Object instantiation

Each class contains a built-in method that you can use to create a new instance of that class. This method is called “constructor”. It has the same name as the class and is invoked with the new keyword. Each instance of the class inherits the attributes and actions of the object. The principle of inheritance is one of the main principles in Java programming. Thanks to it, programs can use “ready-made” properties. For more flexibility, class templates can be defined in a separate file, which can then be used in different programs.

  1. Start a new file by copying the Car class template from the previous example.

class Car

 {

 public final static String color = “Red”;

 public final static String bodyType = “Coupe”;

 public static String accelerate ()

 {

 String motion = “Accelerating …”;

 return motion;

 }

 }

  1. Save the file with the name Car.java.
  2. Create a new program named FirstInstance containing the standard main method.

 class FirstInstance

 {

 public static void main (String [] args) {}

}

4.4 Object instantiation

  1. Inside the curly braces of the main method, add statements for

output each of the attribute values of the Car class, and then call its method.

 System.out.println (“Car color” + Car.color);

 System.out.println (“Body type” + Car.bodyType);

System.out.println (Car.accelerate ());

  1.  Now add statements to create a Porsche instance of the Car class.

Car class

 Car Porsche = new Car ();

  1.  Add statements to display the inherited values of each

the Porsche attribute as well as calling its method.

System.out.println (“Porsche color” + Porsche.color);

 System.out.println (“Porsche Body Type” + Porsche.bodyType);

 System.out.println (Porsche.accelerate ());

  1.  Save the program as FirstInstance.java next to the file java template, then compile and run.

A virtual classroom is created for the new Porsche object, which copies the original Car class. Both of these objects contain static class variables and a class method that can be accessed using dot notation and the class name, but since they are globally accessible, this is not a good programming practice. This example demonstrates how an object instance inherits properties from the original class. The following example uses non-static members – an instance variable and an instance method, which cannot be accessed from outside the class as they are not globally accessible, and this is good programming practice

4.5 Object data creation

An object’s constructor method can be called directly in the object’s class in order to initialize its variables. This will keep the declaration and assignment separate, which is good programming style. This example is demonstrated in the following steps, which reproduce the previous example with an encapsulated method and attributes along with constructor initialization.

  1. Start a new class named Car.

 class Car

 {

 }

  1. Inside the curly braces of the class, declare three closed string variables for storing object attributes.

private String maker;

 private String color;

private String bodyType;

  1. Add a constructor method in which all three are initialized variables with attribute values.

 public Car ()

{

 maker = “Porsche”;

 color = “Silver”;

 bodyType = “Coupe”;

}

  1. Add a private method describing the action.

private String accelerate ()

 {

 String motion = “Accelerating …”;

return motion;

 }

4.5 Object data creation

  1. Add a public method to assign the values of the passed argument to each of the private variables.

public void setCar (String brand, String paint, String style)

 {

 maker = brand;

 color = paint;

 bodyType = style;

}

  1. Add another public method that displays the values of the private variables and calls the private method.

public void getCar ()

 {

 System.out.println (maker + “color” + color);

 System.out.println (maker + typkuzova + bodyType);

 System.out.println (maker + “” + accelerate () + “\ n”);

}

  1. After the Car class, add another class named Constructor that contains the standard main method.

 class Constructor

 {

 public static void main (String [] args) {}

}

  1. Inside the curly braces of the main method, add statements for creating an instance of

the Car class and calling the initial defaults.

Car Porsche = new Car ();

 Porsche.getCar ();

  1. Create another instance by assigning and calling values.

Car Ferrari = new Car ();

 Ferrari.setCar (“Ferrari”, “Red”, “Sporty”);

Ferrari.getCar ();

10. Save the program as Constructor.java, then compile and run.

4.6 Importing functions

Working with Files Java contains a package called java.io for handling file input and output. Such a package can be made available by including an import statement at the very beginning of the .java file. For this, the pattern * is used to include all the classes in the package. For example import java.io. *;. The java.io package contains a class named File that can be used to access files or entire directories. First, you create a File object using the new keyword and supplying the file name or directory name as an argument to the constructor. For example, the syntax for creating a File object named info that will represent a file on the local system named info.dat is as follows: File info = new File (“info.dat”); This file will be located in the same directory as the program, but the argument can contain the full path to the file located anywhere. Note that creating a File object does not actually create a file; it only represents a specific element of the file system. Once the File object representing a specific file on the system has been created, you can call its methods to work on the file. The most used and useful methods of the File object, with a brief description of them, are listed in the table below.

4.6 Importing functions

  1. Create a new program that will import the functions of all classes of the java.io package.

 import java.io. *;

  1. Add a class named ListFiles containing the standard main method.

class ListFiles

 {

 public static void main (String [] args) {}

}

  1. Inside the curly braces of the main method, add a statement that creates a File object for the directory named data.

File dir = new File (“data”);

  1. Add an if statement to display the names of all files in this directory, or display a message if the directory is empty.

if (dir.exists ())

 {

String [] files = dir.list ();

 System.out.println (files.length + “files found …”);

 for (int i = 0; i <files.length; i ++)

 {

 System.out.println (files [i]);

 }

 }

 else

{System.out.println (“Catalog not found.”);

  1. Save the program under the name ListFiles.java inside a data directory

containing several files, then compile and run; you will see the listed filenames as output.

4.7 Command line

The java.io package allows Java programs to read user input at the command line. Similar to the System.out object sending output to the command line, the System.in object can be used to read from the command line using the InputStreamReader object. The input is read byte-by-byte, then converted to integer values representing Unicode character values. To read an entire line of input text, the readLine () method of the BufferedReader reads the characters decoded by the InputStreamReader. This method should be called inside a try catch block to catch IOExceptions (exceptions thrown by I / O). Typically, the readLine () method writes the input to a string variable for further processing in the program.


  1. Create a new program that will import the functionality of all classes. java.io

 import java.io. *;

  1. Add a class named ReadString that contains the standard main method.

class ReadString

 {

 public static void main (String [] args) {}

}

  1. Within the curly braces of the main method, add a statement to display a message prompting the user to enter data.

 System.out.print (“Enter the title of this book:”);

  1. Add a statement that creates an InputStreamReader object to read command line input.

InputStreamReader isr =

 new InputStreamReader (System.in);

4.7 Command line

  1. Create a BufferedReader to read the decoded input.

 BufferedReader buffer = new BufferedReader (isr);

  1. Declare and initialize an empty string variable, in which the input will be saved.

Stringinput = “”;

  1. Add a trycatch statement block to read command line input and store it in a variable.

try

 {

 input = buffer.readLine ();

buffer.close ();

 }

 catch (IOException e)

 {

 System.out.println (“An input error has occurred”);

}

  1. Display a message including the saved input value.

System.out.println (“\ nThank you, you’re reading” + input);

  1. Save the program as ReadString.java, then compile and run.
  2. Enter the requested text, press the Enter key, and you will see an displayed message containing this text.

4.8 File recording

In the java.io package, the FileReader and BufferedReader classes used to read text files have counterparts named FileWriter and BufferedWriter, which can be used to write text files. The FileWriter object is created using the new keyword and takes the name of the file to write to as an argument. The argument can include the full path to a file outside of the directory where the program is located. A BufferedWriter object is created using the new keyword and takes the name of a FileWriter object as an argument. Then, using the write method of the BufferedWriter object, you can write text in which the lines are separated by calling the newLine () method. These methods should be placed inside a try catch block to catch possible I / O exceptions. If a file with the specified name already exists, then the write () method will overwrite the contents of the file, otherwise a new file with this name will be created to which the contents will be written.


1. Create a new program that imports the functions of all classes in the java.io package.

 import java.io. *;

2. Add a class named WriteFile that contains the standard main method.

class WriteFile

 {

 public static void main (String [] args) {}

}

3. Inside the curly braces of the main method, add a try catch block.

 try {}

 catch (IOException e)

 {

 System.out.println (“A write error has occurred”);


 }

4.8 File recording

  1. Within the curly braces of the try block, add a statement to create a FileWriter object for a text file named tam.txt.

FileWriter file = new FileWriter (“tam.txt”);

  1. Create a BufferedWriter object to write the file.

BufferedWriter buffer = new BufferedWriter (file);

  1. Add statements for writing lines of text as well as newline characters to the text file. For example, translation of a work

“Tam O’Shenter” by Robert Burns.

buffer.write (“The wind blew with the last bit of strength,”);

buffer.newLine ();

buffer.write (“And the hail whipped, and the rain poured,”);

buffer.newLine ();

buffer.write (“And the darkness swallowed flashes of lightning,”);

buffer.newLine ();

buffer.write (“And the sky rumbled for a long time …”);

buffer.newLine ();

buffer.write (“On a night like this night,”);

buffer.newLine ();

buffer.write (“The devil himself does not mind taking a walk.”);

  1. Don’t forget to close the BufferedWriter object as it is larger not needed.

buffer.close ();

  1. Save the program as WriteFile.java, then compile and run; it will write the text file

to the same directory as the program.

4.9 Working with date

The java.time package contains a class named LocalDateTime that has useful methods for retrieving specific fields that describe specific timestamps. To work with this class, you either need to import it specifically with the import java.time command. LocalDateTime;, or import all classes of this package using the import java.time. *; Template. Using the now () method, you can create a new LocalDateTime object containing fields that describe the current date and time value. These fields are initialized with the current local system time. The values of the individual fields of the LocalDateTime object can be retrieved using the appropriate methods. For example, the getYear () method calls the value of the “Year” field. Likewise, the values of all fields can be changed by applying the appropriate methods of the LocalDateTime object and specifying the value to set. For example, you can set a new year value by passing it as an argument to the withYear () method.

1. Create a new program that will import all the methods of the class

java.time.LocalDateTime.

 import java.time.LocalDateTime;

2. Add a class named DateTime containing the standard main method.

class DateTime

 {

 public static void main (String [] args) {}


}

4.9 Working with date

  1. Inside the curly braces of the main method, add a statement to create a LocalDateTime object that will contain the current time value.

 LocalDateTime date = LocalDateTime.now ();

  1. Print the current date and time.

System.out.println (“\ nNow” + date);

  1. Increase the value of the year and output the modified value of the current time.

 date = date.withYear (2018);

 System.out.println (“\ nNow current time” + date);

  1. Print the individual fields of the LocalDateTime object.

String fields = “\ nYear: \ t \ t \ t” + date.getYear ();

 fields + = “\ nMonth: \ t \ t \ t” + date.getMonth ();

 fields + = “\ nMonthNumber: \ t \ t” + date.getMonthValue ();

 fields + = “\ nWeekday: \ t \ t” + date.getDayOfWeek ();

 fields + = “\ nDay of the month: \ t \ t” + date.getDayOfMonth ();

 fields + = “\ nDay of the year: \ t \ t” + date.getDayOfYear ();

 fields + = “\ nHour (0-23): \ t \ t” + date.getHour ();

 fields + = “\ nMinute: \ t \ t \ t” + date.getMinute ();

 fields + = “\ nSecond: \ t \ t” + date.getSecond ();

System.out.println (fields);

  1. Save the program as DateTime.java, then compile and run.

4.10 Formatting numbers

Java contains a package called java.text that offers useful classes for formatting numbers, including currency values. The package can be made available in any program by including an import statement at the beginning of the .java file. This can be done using the * pattern that includes all the classes in the package: import java.text. *;, Or by specifying a specific class by name. The java.text package contains a class named NumberFormat that contains methods used to format numeric values ​​in output: adding separators, currency symbols, and percent signs. When a NumberFormat object is created, its formatting type is determined – the getNumberInstance () method for separators, getCurrencyInstance () for currency symbols, and getPercentInstance () for percent signs. Formatting is applied by specifying the numeric value to be formatted as an argument to the format () method of the NumberFormat object. The java.time.format package, which contains the DateTimeFormat class, is used to format objects containing date and time. The DateTimeFormatter object contains a formatting pattern that is specified as a string argument to the ofPattern () method. The formatting pattern includes letters as defined in the documentation, as well as delimiter characters of your choice. For example, the pattern M / d / y defines the month, day, and year, separated by a slash. The format is applied by specifying a formatting pattern as an argument to the format () method of the java.time object.

4.10 Formatting numbers

  1. Create a new program importing functionality all methods of the NumberFormat class of the java.text package, as well as all methods of the DateTimeFormatter class of the java.time.format package.

import java.text.NumberFormat;

 import java.time.format.DateTimeFormatter;

  1. Add a class named Formats containing a standard method main.

 class Formats

 {

 public static void main (String [] args)

{

 }

 }

  1. Inside the curly braces of the main method, add statements for output a number with group separators.

NumberFormat nf = NumberFormat.getNumberInstance ();

 System.out.println (“\ nNumber:” + nf.format (123456789));

  1. Add expressions to display a number with a currency symbol.

NumberFormat cf = NumberFormat.getCurrencyInstance ();

 System.out.println (“\ nCurrency:” + cf.format (1234.50f));

  1. Add expressions to display a number with a percent sign.

NumberFormat pf = NumberFormat.getPercentInstance ()

 System.out.println (“\ nPercent:” + pf.format (0.75f));

  1. Add a statement that creates a LocalDateTime object containing the value of the current time.

java.time.LocalDateTime now =

java.time.LocalDateTime.now ();

4.10 Formatting numbers

  1. Add statements to output the formatted value

dates.

 DateTimeFormatter df =

 DateTimeFormatter.ofPattern (“MMM d, yyy”);

 System.out.println (“\ nDate:” + now.format (df));

  1. Add statements to display the formatted time value.

DateTimeFormatter tf =

 DateTimeFormatter.ofPattern (“h: m a”);

 System.out.println (“\ nTime:” + now.format (tf));

  1. Save the program as Formats.java, then compile and run

SYNOPSIS

The Java programming language was developed in 1990 by James Gosling, an engineer at SunMicrosystems. Subsequently, the language was given the name Java (simply because it sounds better),  and in 1995 it became freely available. In the center of Java language are libraries of files called classes, each of which contains small chunks of tested, ready-to-run code.

Like bricks in a wall, any of these classes can be embedded in a new program, and so there is usually a small amount of code left to write to complete the program. This technique saves programmers a lot of time and is one of the main reasons for the widespread popularity of Java programming. All Java programs usually start out as text files, which are then used to create “class” files, which in turn are actually executable programs. This means that Java programs can be written in any basic text editor, such as Notepad. Follow these steps to create a simple Java program that displays a traditional greeting.

In Java programming, a “variable” is a container in which a value can be stored for later use in a program. The stored value can change as the program is executed – hence the name “variable”. A variable is created using a “declaration” that specifies the type of data contained in the variable and gives it a name.

List of references

  • Cay S. Horstmann. «Core Java Volume I». Prentice Hall. 2020 Informit.com
  • Joshua Bloch. «Effective Java/ 3rd Edition». Addison Wesley. 2017 Informit.com
  • Herbert Schildt. «Java: A Beginner’s Guide, Eighth Edition Paperback». 2018
  • Scott Oaks. «Java Performance: The Definitive Guide Paperback». 2014 oreully.com
  • Mike Mc Grath «The Complete Reference. Java/10 edition», 2018, McGraw Hill Education.

Further reading

1.Robert C. Martin, «Clean code. A Handbook of Agile Software Craftsmanship». 2018

2.Brian Goetz, «Java Concurrency in Practice». 2006 awprofessional.com