Web Programmer - Java

Module 1

Advanced Level

Youth Included ZS.

Unit 5: The Java programming language

AIMS & OBJECTIVES

1) The purpose of this Unit is to enhance migrants’ basic soft skills and competencies, which are needed in today’s labor market and help them in their fist steps while in search for a job.

2) The main part of this presentation is the compilation of programmers with Java.

3) The Unit aims at helping the reader to understand «Play sound», «requesting user input», «text fields», «building interfaces», «adding buttons, labels».

LEARNING OUTCOMES

LOut1: Understand the concept of Java language

LOut2: Describe the installation steps, regarding the Java language

LOut3: Create your first program in Java

LOut4: Demonstrate knowledge in running programs

LOut5: Contrast data types

LOut6: Formulate constants

KEYWORDS

Variables
Java
Javac
JavaDevelopmentKit
James Gosling
JavaRuntimeEnvironment (JRE)
StandardEditionDevelopment Kit (JDK)
1995
Constants

TABLE OF CONTENTS

5.1 Building interfaces

Creating a Window In Java programs, you can create a graphical user interface (GUI) using the graphical component of the Java library called Swing. The javax.swing package contains classes that you can use to create a variety of components using the operating system style. To enable this feature, you need to add an import statement to your program: import javax.swing. * ;. To create a graphical user interface, you need to organize a class to which you can add the components used to build the interface. The easiest way to do this is to declare a subclass of the JFrame class using the extends keyword – thereby inheriting the attributes and methods that allow the user to work with the window: move, resize, and close. The class constructor must include operators that meet the following minimum requirements: • window title – specified as a string argument to the super () inherited method of the JFrame class;

  • window size – specifies the value of the width and height in pixels as arguments to the setSize () method;
  • action when the user closes the window – defined by a constant that is an argument to the setDefaultCloseOperation () method;
  • window display parameter – specified as a graphic type argument to the setVisible () method. Additionally, in the constructor, you can add a window component – the so-called JPanel container, to which smaller components will be added when using the inherited add () method of the JFrame class. The default JPanel (or panel) uses the FlowLayout template manager, which arranges components in columns from left to right, snapping to the right border of the window. The steps below describe how to create a base window containing a JPanel container with a FlowLayout template manager. This window will be used in later examples in the book to demonstrate how to add various components to the JPanel container.


  1. Create a new program into which all Swing components are imported.

 import javax.swing. *;

  1. Create a subclass in the JFrame class named Window that contains the standard main method.

class Window extends JFrame

 {

 public static void main (String [] args) {}

}

  1. Before the main method, create a JPanel container.

 JPanel pnl = new JPanel ();

  1. Then add a constructor specifying the window parameters and adding a JPanel to the JFrame class.

public Window ()

 {

super (“Swing Window”);

setSize (500, 200);

setDefaultCloseOperation (EXIT_ON_CLOSE);

add (pnl);

setVisible (true);

 }

  1. Instantiate the Window class with the following line added to the main method.

 Window gui = new Window ();

6. Save the program as Window.java, then compile and run – you should see a basic window appear

5.2 Adding buttons

You can add buttons to the GUI that are created using the JButton class. With these buttons the user will interact with the program by clicking on them to perform a specific action. The JButton is created using the new keyword, and its constructor takes a string argument that specifies the text to display on the button. You can also place images on buttons. To do this, you first need to create an image object – ImageIcon. The constructor of this object is given the name of the image file as an argument. Usually the image file is placed next to the program, but this is not required, so the argument can include the path to the image outside the program directory. To display an image on a button, you supply the name of the ImageIcon object as an argument to the JButton constructor, or you supply two arguments — the string and the name of the ImageIcon object. In this case, the button will display both text and an image.
1. Edit the copy of the Window.java file described earlier by changing the Window class name in the declaration, constructor, and instance to Buttons.
2. Before the Buttons () constructor, create two ImageIcon objects.
ImageIcon tick = new ImageIcon (“tick.png”);
ImageIcon cross = new ImageIcon (“cross.png”);
3. Then create three JButton objects: the first will display the text, the second will display the image, and the third will display the text and image.
JButton btn = new JButton (“Click me”);
JButton tickBtn = new JButton (tick);
JButton crossBtn = new JButton (“STOP”, cross);
4. Inside the Buttons () constructor, add three statements to add JButton components to the JPanel container.
pnl.add (btn);
pnl.add (tickBtn);
pnl.add (crossBtn);

5.3 Adding labels

You can add a label element to a GUI using the JLabel class. This element is used to display user-invariant text or image, or both. A JLabel object is created using the new keyword, and its constructor takes a string argument that specifies the text to display on the label, or the name of an ImageIcon object that represents the image to display. It can also take three arguments specifying text, image, and horizontal anchoring as a JLabel constant. For example, JLabel (“text”, img, JLabel.CENTER) binds to the center. If the JLabel object contains text and an image, then the relative position of the text can be determined by specifying the JLabel constant as an argument to the setVerticalPosition () and setHorizontalPosition () methods of the JLabel object. There is an additional ToolTip element – a tooltip that appears when you hover the mouse cursor over an object. It can be created using the setToolTipText () method, giving it a string of text with a hint as an argument.

1.Edit the copy of the Window.java file, replacing the class name Window in declaration, constructor, and instance to Labels.

2. Before the Labels () constructor, create an ImageIcon object for the image.

ImageIcon duke = new ImageIcon (“duke.png”);

3.Next, create three JLabels: one for displaying an image, one for displaying text, and a third for both.

JLabel lbl1 = new JLabel (duke);

 JLabel lbl2 = new JLabel (“Duke is the talisman of Java technology.”);

 JLabel lbl3 = new JLabel (“Duke”, duke, JLabel.CENTER);

4. Inside the Labels () constructor, add the following statement to create a hint for the first label.

lbl1.setToolTipText (“Duke is the Java mascot”);

5.After the third label, write two operators to anchor the text center and bottom.

 lbl3.setHorizontalTextPosition (JLabel.CENTER);

 lbl3.setVerticalTextPosition (JLabel.BOTTOM);

6.Now add three operators to add components

JLabel to JPanel container.

pnl.add (lbl1);

pnl.add (lbl2);

pnl.add (lbl3);

7.Save the program as Labels.java, then compile and run by hovering over the first label

If you intend to distribute the program in single Java archive, before creating the ImageIcon object graphic resources must be loaded using the ClassLoader object. The getResource () method of the ClassLoader object needs to specify the filename or a path to it, and the method will return a URL that can be used as an argument to the ImageIcon constructor.

8.Before the Labels () constructor, create a ClassLoader object.

ClassLoader ldr = this.getClass (). GetClassLoader ();

9. Edit the ImageIcon () constructor presented in

Step 2 to load the URL of the resource file using the ClassLoader object.

ImageIcon duke =

 new ImageIcon (ldr.getResource (“duke.png”));

10.Save changes, then re-compile and run program. It can now be redistributed in a JAR file.

5.4 Adding text fields

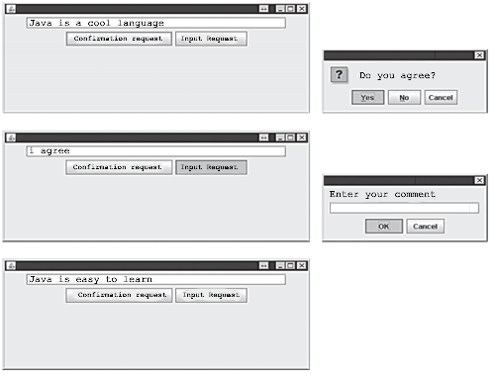
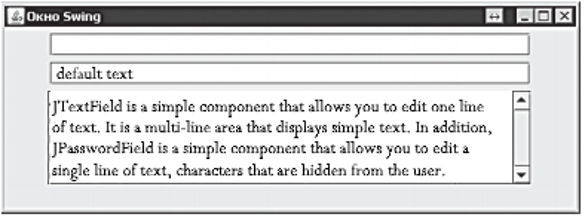
The Swing library provides a JTextField class that creates a GUI component that is a single-line text field. This component allows you to display editable text on the screen with which the user can interact with the program. A JTextField object is created using the new keyword, and its constructor can take a string argument specifying the default text to be displayed in this field. In this case, the component will be resized according to the length of the specified string. Alternatively, the argument can be a numeric value that specifies the size of the text box.

     The constructor can also accept both arguments at the same time – for the default text and for the size of the text box. You can use the JTextArea class to create multi-line text fields. The constructor for this class takes two numeric arguments that specify the number of lines and the width of the field. An alternative option is to provide three arguments that specify the default text, line count, and width. Using the setLineWrap () and setWrapStyleWord () methods of the JTextArea object, you can control word wrapping, thereby adjusting the width of the entered text to fit the box.

1.Edit the copy of the Window.java file, replacing the class name Window in declaration, constructor, and instance to TextFields.

2.Before the constructor TextFields () create two objects

JTextField.

 JTextField txt1 = new JTextField (38);

 JTextField txt2 = new JTextField (“Default Text”, 38);

3.Create a JTextArea that is five lines high.

 JTextArea txtArea = new JTextArea (5, 37);

4.Add a JScrollPane that will contain the object

JTextArea created in the previous step.

JScrollPane pane = new JScrollPane (txtArea);

5.In the TextFields () constructor method, add operators to enable the word wrap option.

txtArea.setLineWrap (true);

 txtArea.setWrapStyleWord (true);

6.Add an operator to always display the vertical scrollbars for the JTextArea object.

pane.setVerticalScrollBarPolicy

(JScrollPane.VERTICAL_SCROLLBAR_ALWAYS);

7.Add two operators to add JTextField components to the JPanel container.

pnl.add (txt1);

pnl.add (txt2);

8.Insert another statement to add the JScrollPane (containing the JTextArea) to the JPanel.

pnl.add (pane);

9. Save the program as TextFields.java, then compile and run by entering text in the text fields.

5.5 Adding radio buttons

The Swing library provides a JRadioButton class that is used to create a GUI component such as a radio button. It can be used to allow the user to select one item from a group of such radio buttons. A JRadioButton is created using the new keyword, and its constructor takes a string argument that specifies the text to display next to the radio button. The constructor can also accept a second boolean argument that is true, which specifies that the corresponding radio button is selected by default. Radio buttons are logically combined into a group using the ButtonGroup object, and only one of them can be selected from this group at a time. A radio button is added to the ButtonGroup object using its add () method by specifying the name of this radio button as an argument to this method.

1.Edit the copy of the Window.java file, replacing the class name Window in declaration, constructor and instance on Radios.

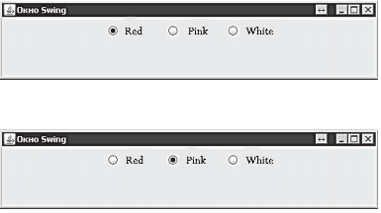
2.Before the Radios () constructor, create three JRadioButton objects, make one of them the default.

JRadioButton rad1 = new JRadioButton (“Red”, true);

 JRadioButton rad2 = new JRadioButton (“Pink”);

 JRadioButton rad3 = new JRadioButton (“White”);

3.Then create a ButtonGroup object to group the radio buttons.

 ButtonGroup wines = new ButtonGroup ();

4.In the Radios () constructor method, insert statements to add JRadioButton components to the JButtonGroup.

wines.add (rad1);

wines.add (rad2);

wines.add (rad3);

5.Insert statements to add JRadioButton components into a JPanel container.

pnl.add (rad1);

pnl.add (rad2);

pnl.add (rad3);

6. Save the program as Radios.java, then compile and run by selecting any of the buttons.

5.6 Change the appearance of the interface

The java.awt (Abstract Window Toolkit) package contains “drawing” classes that you can use to “decorate” the appearance of interface components. This package can be made available in your program by including an initial import statement java.awt. *; … Inside the java.awt package is the Color class, which contains constants representing several basic colors, such as Color.RED. Using the new keyword, you can instantiate the Color class to represent your custom colors. The constructor can take three integer arguments, whose values range from 0 to 255. These arguments will represent the RGB (red, green, blue) components that form the custom color. Any interface component contains the setBackground () and setForeground () methods, which take a Color object as their argument to paint the component with the specified color. Note that the background of JLabel components is always transparent by default, so you must set the opacity to true using the setOpaque () method before changing the component colors. There is also a Font class in the java.awt package that can be used to change the font of the displayed text. The Font constructor can take three arguments that specify the name, style, and size of the font:

  • the name must be one of three platform-independent names: Serif, SansSerif or Monospaced; • one of these three constants should be used as a style: Font.PLAIN, Font.BOLD or Font.ITALIC
  • size must be an integer indicating the number of points

To change the font color of any of the interface components, there is a setFont () method that takes a Font object as an argument.

1.Edit the copy of the Window.java file, replacing the class name Window in the declaration, in the constructor, and in the Custom instance.

2. Add a statement at the very beginning of the program to import the functionality of all classes in the java.awt package.

 import java.awt. *;

3.Before the Custom () constructor, create three JLabel objects.

 JLabel lbl1 = new JLabel (“Custom background”);

 JLabel lbl2 = new JLabel (“Custom Foreground”);

 JLabel lbl3 = new JLabel (“Custom Font”);

4.Create a Color object.

 Color customColor = new Color (255, 0, 0);

5.Create a Font object.

 Font customFont = new Font (“Serif”, Font.PLAIN, 32);

6.In the Custom () constructor, add operators to change the color the background of the JLabel using the Color constant.

lbl1.setOpaque (true);

 lbl1.setBackground (Color.YELLOW);

7.Add an operator to change the foreground color of the object

JLabel using a custom Color object.

 lbl2.setForeground (customColor);

8.Add a statement to change the text on the JLabel using a custom font.

 lbl3.setFont (customFont);

9.Add all labels to the JPanel container.

pnl.add (lbl1); pnl.add (lbl2); pnl.add (lbl3);

10. Save the program as Custom.java, then compile and run to see the result of modifying the components

5.7 Play sound

The java.applet package contains a class named AudioClip that has built-in methods for playing audio files in .au, .aiff, .wav, and .mid formats. Compatibility with Swing library components is maintained through the JApplet class, which offers a newAudioClip () method that returns the URL of the audio file. The audio file must be loaded as a resource into the AudioClip object using the getResource () method of the ClassLoader object – just like an image file. In response to user actions, playback of the audio file can be started and stopped using the play () and stop () methods of the AudioClip object. Alternatively, the audio file can be played continuously using the loop () method.

1.Edit the copy of the Window.java file by replacing the class name Window in the declaration, constructor, and instance statement with Sound.

2.Add a start statement to import the functionality of all classes in the java.awt.event package.

import java.awt.event. *;

3.Edit the class declaration to add an interface

ActionListener in the program.

class Sound extends JFrame implements ActionListener

4.Before the Sound () constructor, create a ClassLoader object.

ClassLoader ldr = this.getClass (). GetClassLoader ();

5.Create an AudioClip object and load the audio resource file using the ClassLoader object.

java.applet.AudioClip audio =

JApplet.newAudioClip (ldr.getResource (“music.wav”));

6.Create two JButtons to control audio playback.

JButton playBtn = new JButton (“Play”);

JButton stopBtn = new JButton (“Stop”);

7.Add buttons to the JPanel container.

pnl.add (playBtn);

pnl.add (stopBtn);

8.In the Sound () constructor insert the statements to generate

ActionEvent event for each button when they are pressed.

playBtn.addActionListener (this);

stopBtn.addActionListener (this);

9.After the constructor method, add an event handler for the ActionListener interface.

public void actionPerformed (ActionEvent event) {}

10.Inside the curly braces of the event handler, insert the statement to play the audio file by pressing the play button.

if (event.getSource () == playBtn) audio.play ();

11.Insert a statement to stop playing the audio file by pressing the stop button.

if (event.getSource () == stopBtn) audio.stop ();

12.Save the program as Sound.java, then compile and run using the buttons to control the playback of the audio file.

5.8 Displaying messages

The Swing library provides the JOptionPane class for creating a standard dialog box. The showMessageDialog () method of this class displays a message to the user; the message contains various information, warning or error description. The displayed message is centered on the parent window. The showMessageDialog () method can take four arguments:

  • parent object – usually referred to by the this keyword;
  • string message to display;
  • string title of the dialog;
  • one of the constants: INFORMATION_MESSAGE, WARNING_MESSAGE or ERROR_MESSAGE.

Depending on which constant is specified, a corresponding icon will be displayed in the dialog box.

1.Edit the copy of the Window.java file, replacing the class name Window in the declaration, constructor, and instance statement on Messages.

2.Add a start statement to import the functionality of the java.awt.event package.

 import java.awt.event. *;

3.Edit the class declaration to add an interface ActionListener in the program.

 class Messages extends JFrame implements ActionListener

4.Before the Messages () constructor, create three components JButton.

 JButton btn1 = new JButton (“Show info message”);

 JButton btn2 = new JButton (“Show warning”);

 JButton btn3 = new JButton (“Show error message”);

5.Insert statements to add button components to the JPanel

pnl.add (btn1);

pnl.add (btn2);

pnl.add (btn3);

6.In the Messages () constructor, insert statements that raise ActionEvent events for each button.

btn1.addActionListener (this);

 btn2.addActionListener (this);

btn3.addActionListener (this);

7.After the constructor method, add an event handler method for the ActionListener interface.

public void actionPerformed (ActionEvent event) {}

8.Within the curly braces of the handler method, insert conditional statements that display the dialog

when the keys are pressed.

if (event.getSource () == btn1)

 JOptionPane.showMessageDialog (this, “Information …”,

 “Dialogue Message”, JOptionPane.INFORMATION_MESSAGE);

 if (event.getSource () == btn2)

 JOptionPane.showMessageDialog (this, “Warning …”,

 “Dialogue Message”, JOptionPane.WARNING_MESSAGE);

 if (event.getSource () == btn3)

 JOptionPane.showMessageDialog (this, “Error …”,

 “Dialogue message”, JOptionPane.ERROR_MESSAGE);

9. Save the program as Messages.java, then compile and run by clicking on each of the buttons.

5.9 Requesting user input

Swing provides a JOptionPane class that allows you to prompt the user for information using two methods that open a dialog box — the showConfirmationDialog () method, which asks for confirmation, and the showInputDialog () method, which prompts the user for a string. Both of these methods can take four arguments:

  • parent object – a link to it is defined by the this keyword;
  • query string for display; • string defining the title of the dialog box;
  • one of the JOptionPane constants, such as PLAIN_MESSAGE, which defines the buttons to confirm,

YES_NO_CANCEL_OPTION. The dialog box will return an input string in the case of an input dialog or an integer as a result of pressing the confirmation buttons – 0 for confirmation, 1 for refusal, or 2 for canceling.

1.Edit the copy of the Window.java file, replacing the class name

Window in the declaration, constructor, and instance statement on Request. Then add a start statement to import the functionality of the java.awt.event package.

 import java.awt.event. *;

2.Edit the class declaration to add the ActionListener interface to the program.

class Request extends JFrame implements ActionListener

3.Before the Request () constructor, create the JTextField components and the JButton component.

 JTextField field = new JTextField (38);

JButton btn1 = new JButton (“Confirmation Request”);

JButton btn2 = new JButton (“RequestInput”);

4.Add all components to the JPanel container.

pnl.add (field); pnl.add (btn1); pnl.add (btn2);

5.In the Request () constructor, insert statements that will fire an ActionEvent for each button.

 btn1.addActionListener (this);

 btn2.addActionListener (this);

6.After the constructor method, add an event handler method for the ActionListener interface.

public void actionPerformed (ActionEvent event) {}

7.Inside the curly braces of the event handler, insert a conditional statement to organize the response to button clicks.

if (event.getSource () == btn1)

 {

 int n = JOptionPane.showConfirmDialog (this,

“Do you agree?” , “Confirmation Dialogue”,

 JOptionPane.YES_NO_CANCEL_OPTION);

switch (n)

 {

 case 0: field.setText (“Agree”); break;

 case 1: field.setText (“Disagree”); break;

 case 2: field.setText (“Canceled”); break;

}

 }

8.Insert a conditional statement to process user input.

if (event.getSource () == btn2)

field.setText (JOptionPane.showInputDialog (this,

“Enter your comment”, “Input dialog”,

 JOptionPane.PLAIN_MESSAGE));

 Save the program as Request.java, then compile and run, selecting each of the buttons with the pointer

SYNOPSIS

The Java programming language was developed in 1990 by James Gosling, an engineer at SunMicrosystems. Subsequently, the language was given the name Java (simply because it sounds better), and in 1995 it became freely available. In the center of Java language are libraries of files called classes, each of which contains small chunks of tested, ready-to-run code.
Like bricks in a wall, any of these classes can be embedded in a new program, and so there is usually a small amount of code left to write to complete the program. This technique saves programmers a lot of time and is one of the main reasons for the widespread popularity of Java programming. All Java programs usually start out as text files, which are then used to create “class” files, which in turn are actually executable programs. This means that Java programs can be written in any basic text editor, such as Notepad. Follow these steps to create a simple Java program that displays a traditional greeting.
In Java programming, a “variable” is a container in which a value can be stored for later use in a program. The stored value can change as the program is executed – hence the name “variable”. A variable is created using a “declaration” that specifies the type of data contained in the variable and gives it a name

List of references

  • Cay S. Horstmann. «Core Java Volume I». Prentice Hall. 2020 Informit.com
  • Joshua Bloch. «Effective Java/ 3rd Edition». Addison Wesley. 2017 Informit.com
  • Herbert Schildt. «Java: A Beginner’s Guide, Eighth Edition Paperback». 2018
  • Scott Oaks. «Java Performance: The Definitive Guide Paperback». 2014 oreully.com
  • Mike Mc Grath «The Complete Reference. Java/10 edition», 2018, McGraw Hill Education.


Further reading

1.Robert C. Martin, «Clean code. A Handbook of Agile Software Craftsmanship». 2018

2.Brian Goetz, «Java Concurrency in Practice». 2006 awprofessional.com